Appendix: Running Without the Board#
You can follow the book without an Arduino UNO R4 WiFi on your desk. The same firmware you would flash to the board runs on your PC instead, with the 12×8 LED matrix and the built-in LED drawn on a photo of the board in your browser. The shell you build in Chapter 5 works too.
pio run -e sim   →   firmware.elf   →   QEMU (RA4M1)   →   browser
  (the usual        (the very ELF       (the same           (LEDs light up
   build)            you would flash)    Cortex-M4)          on the board)
In the diagram, QEMU is an emulator that reproduces the CPU and the board in software, and ELF is the format of the executable file the build produces.
Not a single line of the sample code changes. The only difference from the
build for real hardware is one extra flag, -D NO_USB, which comes from the
Arduino core itself (see below).
Note
The browser version needs no install. The part from “What you need” onwards, which runs the simulator on your PC, assumes the environment from PlatformIO Setup and the OS-specific pages (Developing on Windows, Developing on Linux, Developing on macOS). Set that up first, then come back.
Tip
Try it in your browser first, with nothing to install. A page runs each
chapter’s firmware on QEMU compiled to WebAssembly, right in the browser, so
you can watch the LEDs and use the shell without setting anything up. It can
run a firmware.elf you built yourself, too (Running a firmware.elf you built yourself).
The browser build of QEMU interprets instructions, so timers and blinking run in real time but heavy computation is slower than on the board. When you want to compare output with the text closely, use the PC install below or the board. (The page itself is in Japanese.)
Note
The kernel in this book only uses standard Cortex-M facilities — SysTick, PendSV, NVIC, MPU (all of these come up in the book in turn). Those behave in the emulator as they do on silicon, and the faults in Chapter 6 (divide by zero, bad address) happen just as the text describes.
Running it in the browser#
The page starts each chapter’s firmware (built with pio run -e sim) on QEMU
inside the browser. Pick a chapter from the menu at the top. In chapters with a
shell, type commands into the box at the bottom. (The page itself is in
Japanese.)
Running a firmware.elf you built yourself#
After changing a sample, hand the firmware.elf from the build to the browser
version and watch it run, without flashing anything. Here we change the message
printed by 00_intro.
In
00_intro/src/main.cpp, changeEnvironment OK!to anything you like (the GIF below usessedto replace it withHello from my build!).Build it. No upload (
-t upload) is needed.pio run -d 00_intro
The ELF ends up in
00_intro/.pio/build/uno_r4_wifi/firmware.elf.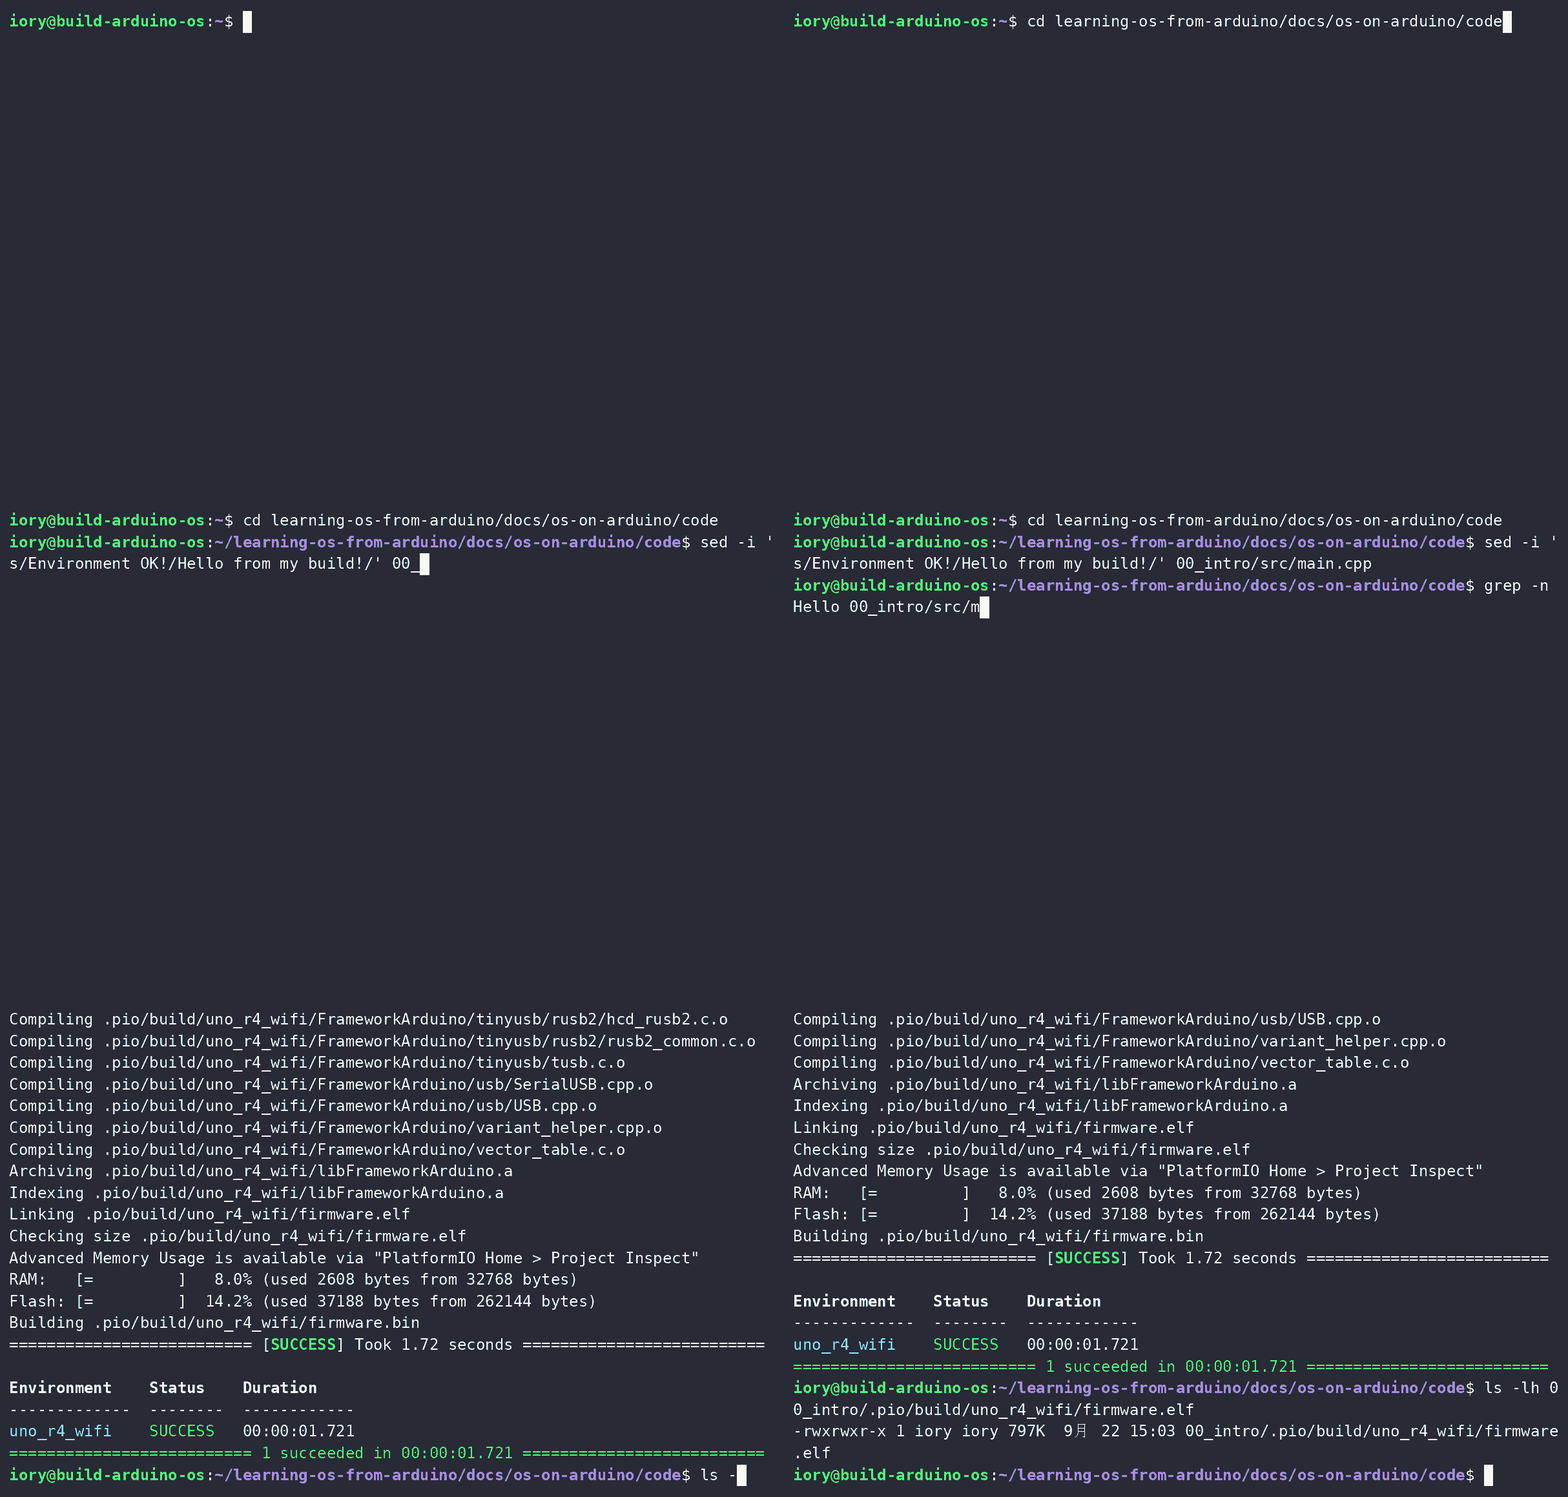
Changing the message, building, and finding
firmware.elf#Open the browser version and choose the last entry in the chapter menu, 「自分でビルドした ELF を動かす…」 (“run an ELF you built”).
Drop
firmware.elfonto the box that appears (or click the box and pick the file).If the serial monitor shows your new message and the LED matrix shows “OS”, it worked.
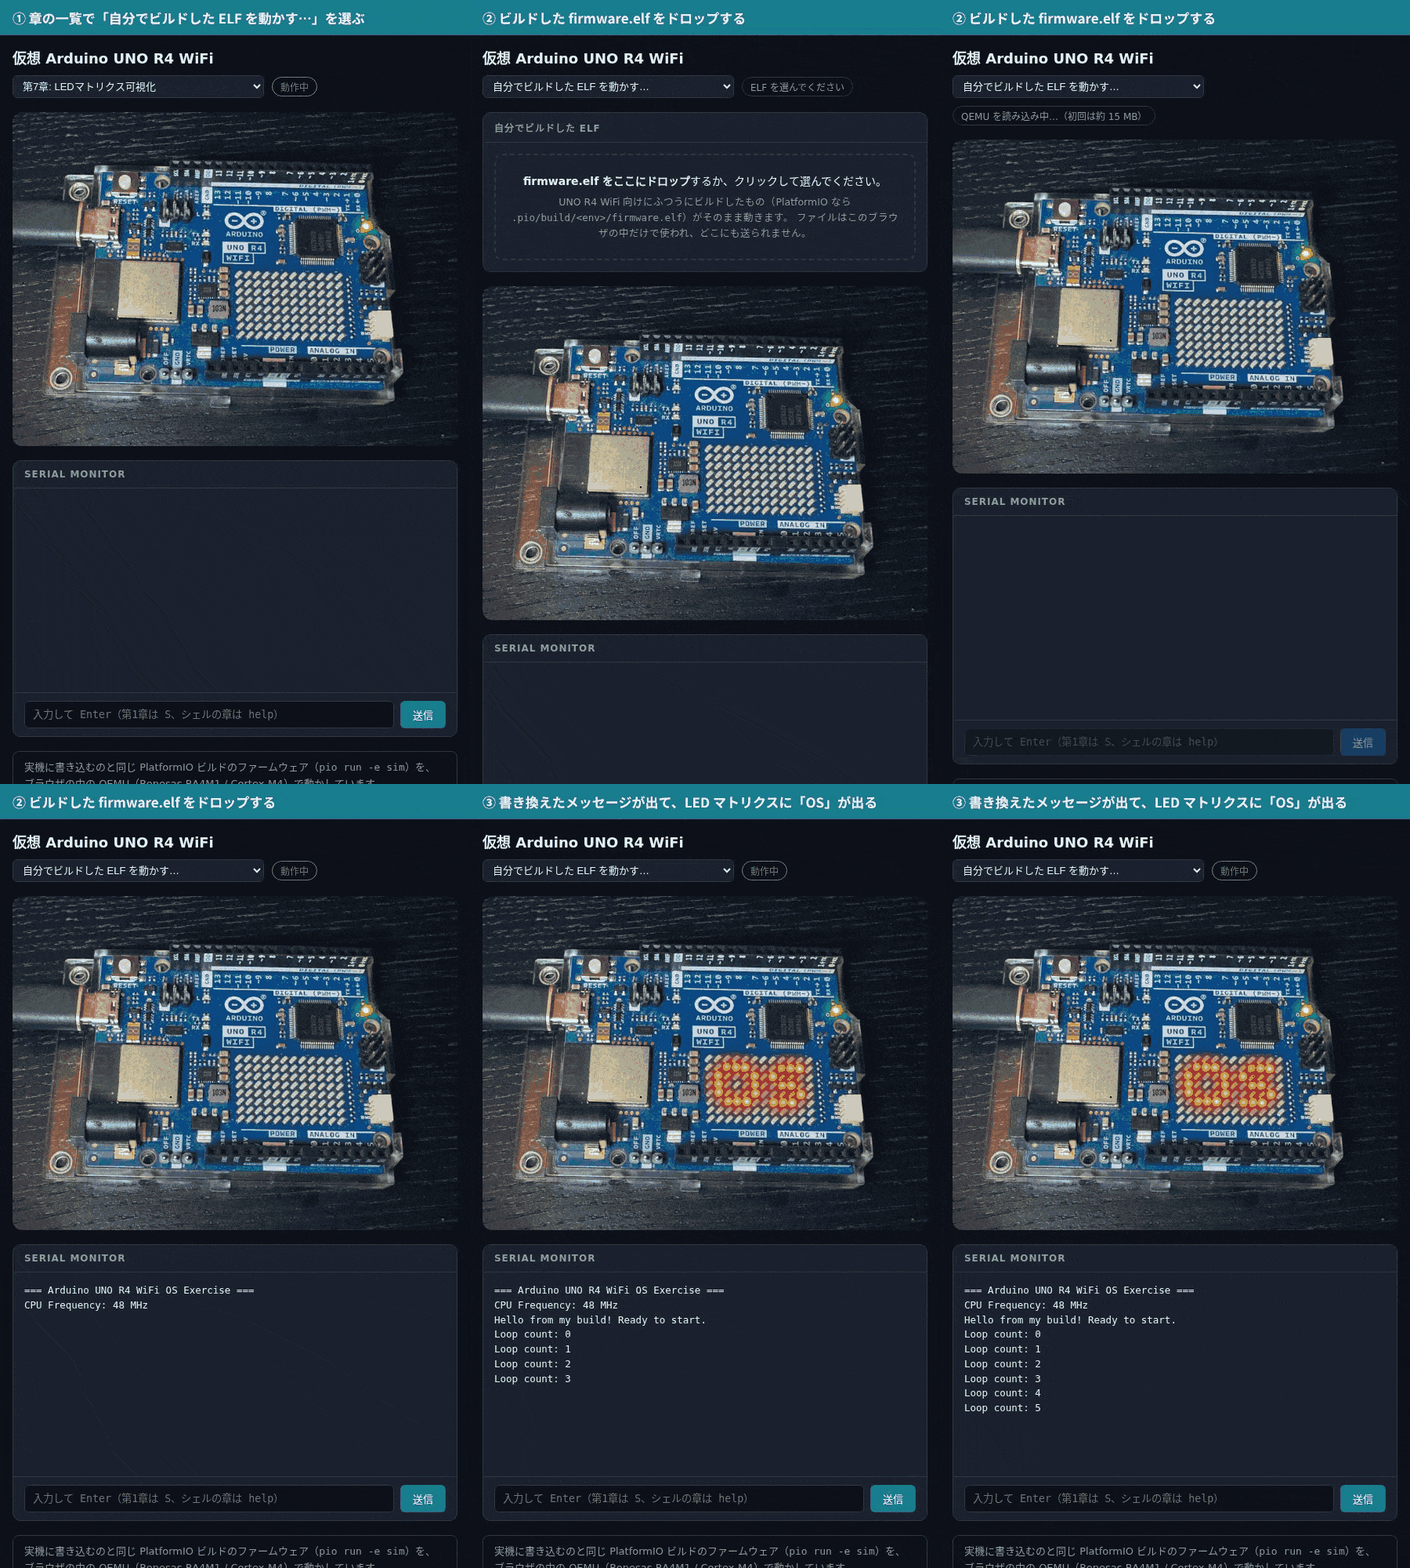
Dropping the freshly built
firmware.elfprints the changed message#
Note
An ordinary UNO R4 WiFi build runs as it is. Arduino’s
boards.txtdefines-DNO_USBfor the UNO R4 WiFi, soSerialis a UART already (pio runandpio run -e simproduce the very same ELF).The file is used only inside your browser and is not sent anywhere.
Only
.elffiles work (not.binor.hex). A build whoseSerialgoes over USB, such as one for the UNO R4 Minima, shows no serial output because the emulator has no USB; the page tells you so.Switching chapters reloads the page. To run your ELF again, choose the entry again.
Limits of the browser version#
It runs at about a tenth of the board’s speed. Timers and blinking keep real time, but heavy computation is slow. Chapter 4’s Heavy task barely progresses, and the CPU% column of
psin Chapter 9 can add up to a little over 100% (the page warns about both).Characters typed before boot finishes are lost. Wait for the prompt (such as
>) before typing.
When you want to compare output with the text closely, use the PC install below or the board.
What you need#
Where to get it |
|
|---|---|
QEMU (UNO R4 build) |
|
Python 3.10 or later |
Standard library only, no |
PlatformIO |
The same one as in PlatformIO Setup |
Upstream QEMU does not include the UNO R4’s microcontroller (Renesas RA4M1),
so a build that adds it is published for this book. The qemu-system-arm
from Homebrew or apt will not work.
Installing QEMU#
Download the file for your OS from the releases page and unpack it into a
qemu-unor4 folder in your home directory. The virtual board finds it there
automatically.
For Apple silicon (macOS 14 or later) and Intel Macs (macOS 15 or later).
mkdir -p ~/qemu-unor4 && cd ~/qemu-unor4
arch=$(uname -m)   # arm64 or x86_64
curl -fLO "https://github.com/iory/qemu-arduino-uno-r4/releases/download/v11.1.1-unor4.5/qemu-arduino-uno-r4-v11.1.1-unor4.5-macos-$arch.tar.gz"
tar xzf qemu-arduino-uno-r4-*-macos-*.tar.gz --strip-components=1
~/qemu-unor4/bin/qemu-system-arm --version
The libraries it needs are bundled, so Homebrew is not required.
If you downloaded the file with a browser, macOS refuses to run it because the developer cannot be verified. Run this once on the unpacked folder:
xattr -dr com.apple.quarantine ~/qemu-unor4
On older Intel Macs that cannot run macOS 15, use Renode (see below).
There are x64 and ARM64 (Snapdragon X, etc.) builds. On Windows on ARM, use the ARM64 build — the x64 one does not work under emulation.
In PowerShell:
$arch = if ($env:PROCESSOR_ARCHITECTURE -eq 'ARM64') { 'arm64' } else { 'x86_64' }
$name = "qemu-arduino-uno-r4-v11.1.1-unor4.5-windows-$arch"
Invoke-WebRequest "https://github.com/iory/qemu-arduino-uno-r4/releases/download/v11.1.1-unor4.5/$name.zip" -OutFile "$name.zip"
Expand-Archive "$name.zip" -DestinationPath "$HOME\qemu-unor4"
& "$HOME\qemu-unor4\$name\bin\qemu-system-arm.exe" --version
The DLLs it needs are bundled in bin.
There are x86_64 and arm64 builds (glibc 2.35 or later, i.e. Ubuntu 22.04 or newer). However, the PlatformIO compiler this book builds with is not available for Linux arm64, so the chapters can only be built on x86_64 (the same goes for the 64-bit Raspberry Pi OS).
mkdir -p ~/qemu-unor4 && cd ~/qemu-unor4
arch=$(uname -m); [ "$arch" = aarch64 ] && arch=arm64
curl -fLO "https://github.com/iory/qemu-arduino-uno-r4/releases/download/v11.1.1-unor4.5/qemu-arduino-uno-r4-v11.1.1-unor4.5-linux-$arch.tar.gz"
tar xzf qemu-arduino-uno-r4-*-linux-*.tar.gz --strip-components=1
~/qemu-unor4/bin/qemu-system-arm --version
The only library it uses is glib, which almost every distribution already
has; if not, sudo apt install libglib2.0-0. It needs no display, so it
works without DISPLAY (over SSH, for example).
Running it#
cd code/04_scheduler
uv run pio run -e sim                # build for the simulator
uv run python ../sim/board.py --chapter .  # start the virtual board
Open http://127.0.0.1:8080 in your browser to see the board. Press Ctrl-C to
stop. (localhost works too, but on Windows it tries IPv6 first and takes a
few seconds longer.)
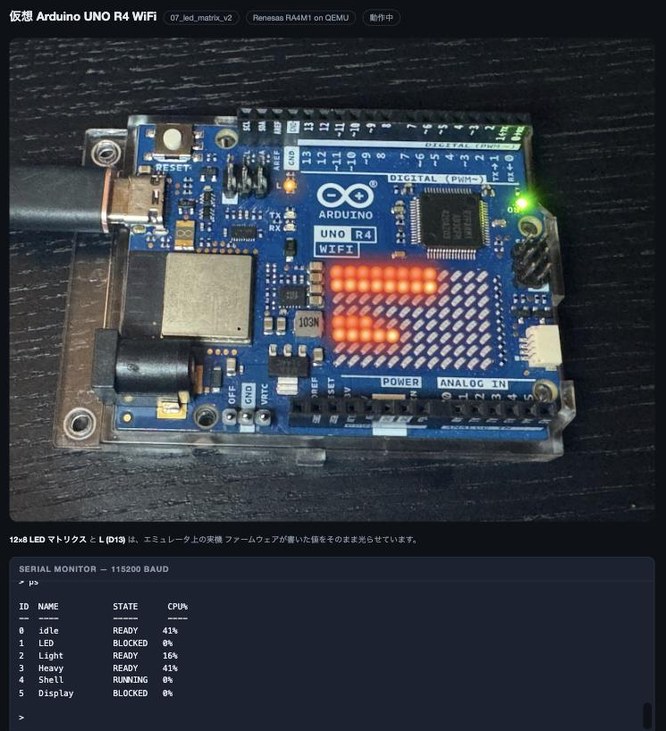
The improved Chapter 7 sample, 07_led_matrix_v2, after typing ps into the
serial monitor. The board is at the top, the serial monitor below it. The bars
on the matrix show the same numbers as the CPU% column of ps.#
On Windows, type python instead of python3.
If you put QEMU somewhere other than qemu-unor4, pass its qemu-system-arm
(qemu-system-arm.exe on Windows) with --qemu, or set the QEMU
environment variable to that path.
What you are looking at#
12×8 LED matrix — the 12-byte frame buffer that
Arduino_LED_Matrixscans out on the real board, read directly and lit upL (D13) — the output bit of the port register
PCNTR1Serial monitor — two-way. Type into the input box and the shell from Chapter 5 onwards, or TinyPython in Chapter 11, works as usual
As on the real board, Chapter 1 waits for an S at start-up. Type S into the
input box.
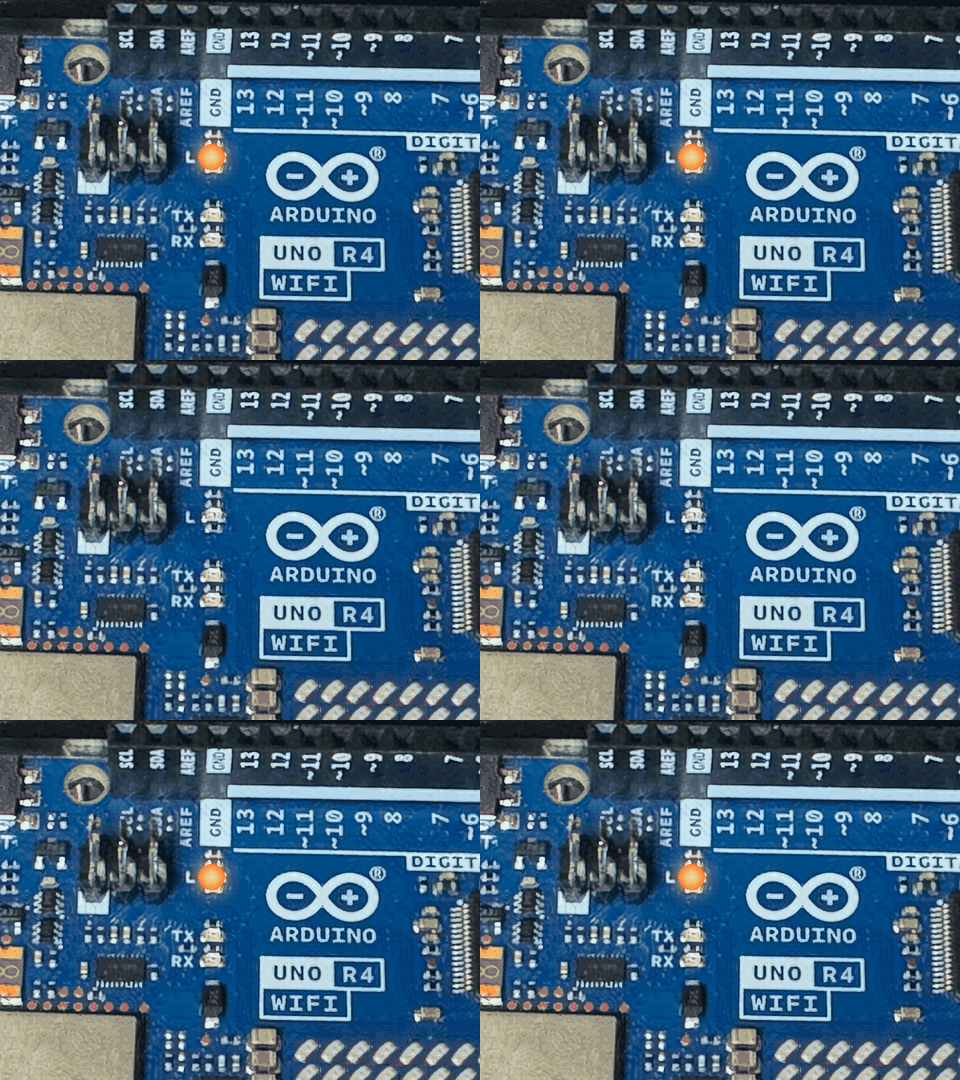
The Chapter 2 sample blinking the built-in LED “L” (D13), zoomed in around it.#
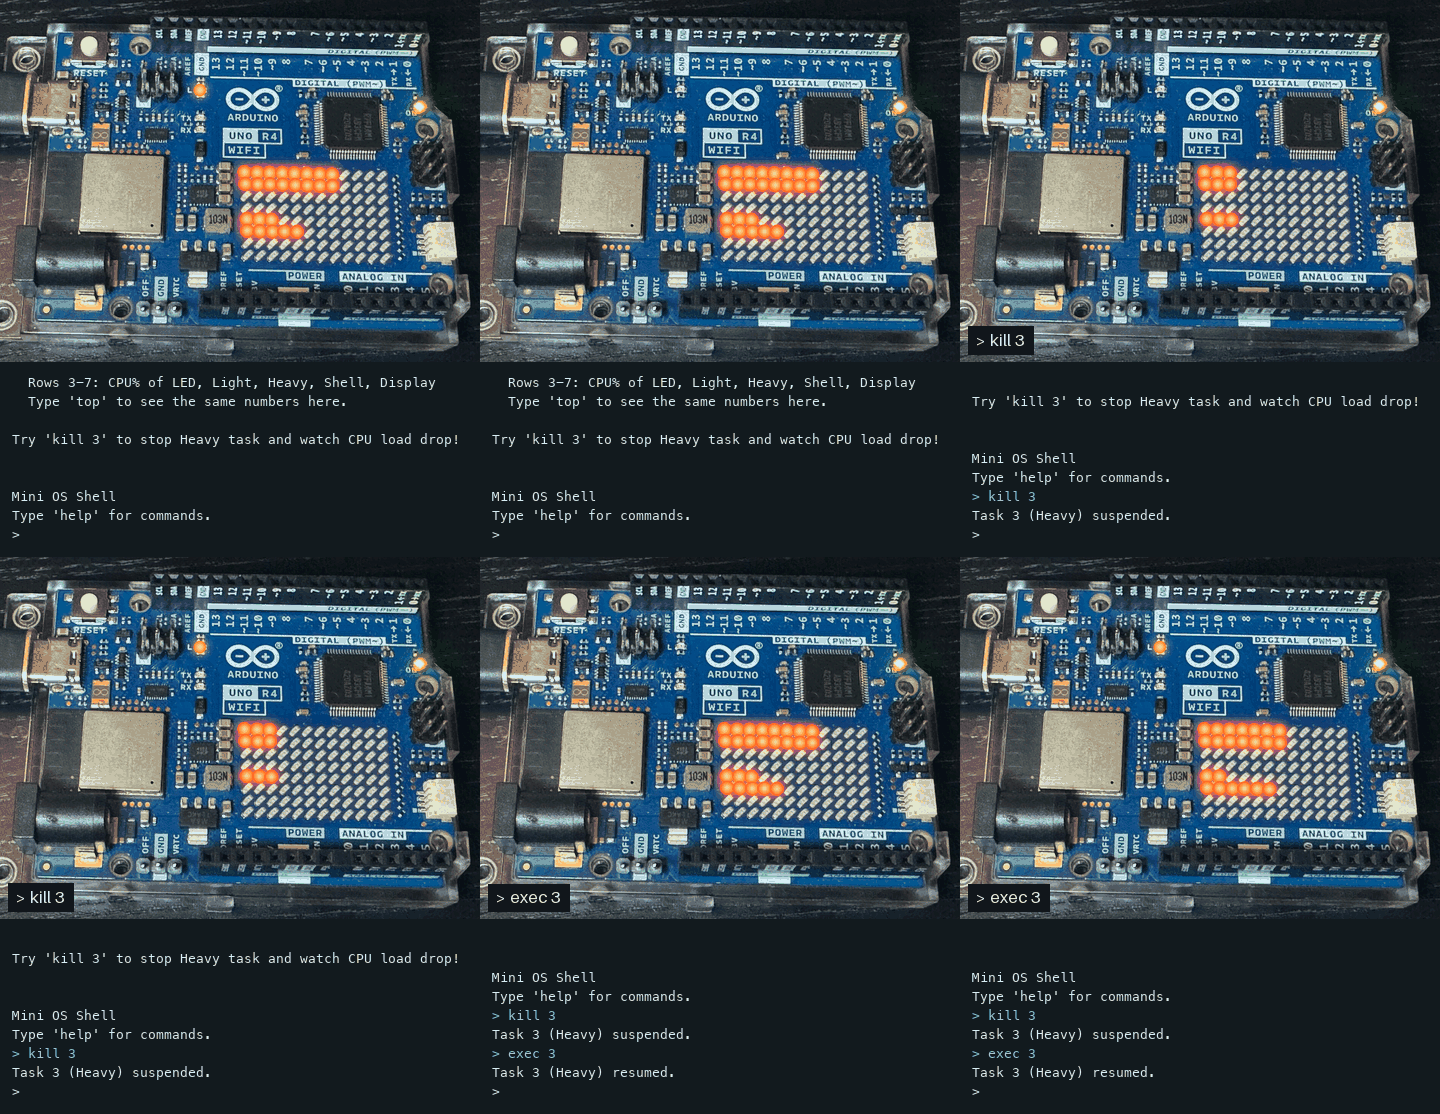
The improved Chapter 7 sample, 07_led_matrix_v2. Each bar on the matrix is CPU
usage, with 12 dots meaning 100%. The top two rows are the whole CPU; after one blank row, the five rows
below are one per task (LED, Light, Heavy, Shell, Display from the top).
Stopping the busy task (Heavy) with kill 3 removes its row and shrinks the
total bar; exec 3 brings them back.#
Chapter coverage#
Chapter |
Simulator |
|---|---|
Chapters 0–11, Advanced 1–3 |
✅ Works |
Chapter 12 (hardware) |
❌ Needs the actual sensors and actuators |
Chapter 13 (quadruped) |
❌ Needs the servos and the robot |
Advanced 4 (file system) |
❌ Needs the Renesas FSP flash driver |
How it differs from real hardware#
These are the places where the emulator differs from the board. Some of them contradict the text, so keep this section in mind when something looks off.
Serialis a UART, not USB The emulator has no USB, so-D NO_USBswitchesSerialto a hardware UART (SCI9). ThatSerialis USB CDC (the standard way for a USB device to show up as a serial port) on the UNO R4 WiFi is itself a topic of the book, so check that part on the real board.No ESP32 / Wi-Fi The second chip on the UNO R4 WiFi is not there.
Time is approximate Time advances by 16 ns per instruction (about 48 MHz). You can follow task switching periods and CPU load trends, but cycle counts per instruction and interrupt jitter are not the real thing. Do the final real-time check on the board.
Peripherals the book does not use are missing Only the timer (AGT), serial (SCI), GPIO and the interrupt controller are there — no ADC, I²C, SPI, PWM timers and so on.
Note
Tested on macOS 26 (Apple silicon), Windows 11 (ARM64) and Ubuntu 24.04 (x86_64). In addition, GitHub Actions follows this appendix every week on five environments — macOS (Apple silicon / Intel), Windows (x64 / ARM64) and Ubuntu (x86_64) — and runs every chapter. If it does not work for you, please open an issue.
Troubleshooting#
“Firmware not found”
Did you run pio run -e sim? The plain pio run for the real board does not
produce the emulator build (.pio/build/sim/firmware.elf).
“qemu-system-arm with the arduino-uno-r4 machine not found”
The message lists every place it looked and why each one did not work.
Check that QEMU is unpacked into qemu-unor4 in your home directory, or that
--qemu points at the qemu-system-arm you unpacked. Upstream QEMU from
Homebrew or apt will not work. If macOS says the developer
cannot be verified, run the xattr command above.
Nothing on the serial monitor
Some chapters are waiting for input (Chapter 1 waits for S; from Chapter 5
the shell shows a prompt).
Port already in use
Change the ports with --http-port / --monitor-port / --uart-port.
The PC is slow / the fan keeps spinning
If board.py is killed forcibly (kill -9 and the like), QEMU can be left
running (Ctrl-C or closing the terminal stops it automatically). On macOS and
Linux run pkill -f qemu-system-arm; on Windows end qemu-system-arm.exe in
Task Manager.
Running the chapter checks automatically#
The book’s verification script can use the emulator instead of the board. The expected values are the same ones taken from the “expected output” in the text.
cd code
uv run python scripts/verify_chapters.py --sim
uv run python scripts/verify_chapters.py --sim --only 05_shell
code/sim/record.py records the board as an animated GIF.
Using Renode instead#
The same screen also runs on the open-source emulator Renode (1.17 or later). Use it on Intel Macs that cannot run macOS 15. Renode ships with the RA4M1, so its official releases work as they are.
macOS:
brew trust renode/tap && brew install renode/tap/renode(withoutbrew trustfirst, the install stops withuntrusted tap)Windows:
renode-*.setup.exe(also runs on Windows on ARM through x64 emulation)Linux: unpack
renode-*.linux-portable.tar.gz(.NET included)
All of them are at renode/renode. Start the
board with --emulator renode:
uv run python ../sim/board.py --chapter . --emulator renode
uv run python ../sim/board.py --chapter . --emulator renode --renode /path/to/renode  # if not on PATH
The verification script also takes --emulator renode.
The difference from QEMU is that the Chapter 6 faults do not happen.
Renode does not implement CCR.DIV_0_TRP, so a division by zero does not
raise a UsageFault, and a write to unmapped memory does not raise a BusFault.
You can still see that “only the broken task dies and the others keep
running”, but not the FAULT DETECTED report and its cause (the verification
script marks those checks SKIP).
If Renode is left running, stop it with pkill -f Renode (on Windows, end
Renode.exe).
How it works#
code/sim/README.md explains which addresses are read and how the state is
streamed to the browser. The virtual board itself (board.py and
board.html) is about 600 lines. The QEMU side (the RA4M1 interrupt
controller, SCI, AGT and GPIO) is at
iory/qemu-arduino-uno-r4.