Developing on macOS#
macOS is the reference environment for this book. No driver install is needed — the port appears as soon as you plug the board in, and every chapter builds and flashes with the same commands as on Windows and Linux.
The differences are that the port is named /dev/cu.usbmodem… and that
the same board gets two names, /dev/cu. and /dev/tty.
Note
The output on this page was captured with a real Arduino UNO R4 WiFi attached to macOS 26.5.1 (Apple Silicon / arm64).
1. Set up#
Open a terminal#
Every command on this page is typed into a terminal. The quickest way is
Command + Space for Spotlight, then type Terminal and press Enter. It is
also under Applications › Utilities › Terminal.
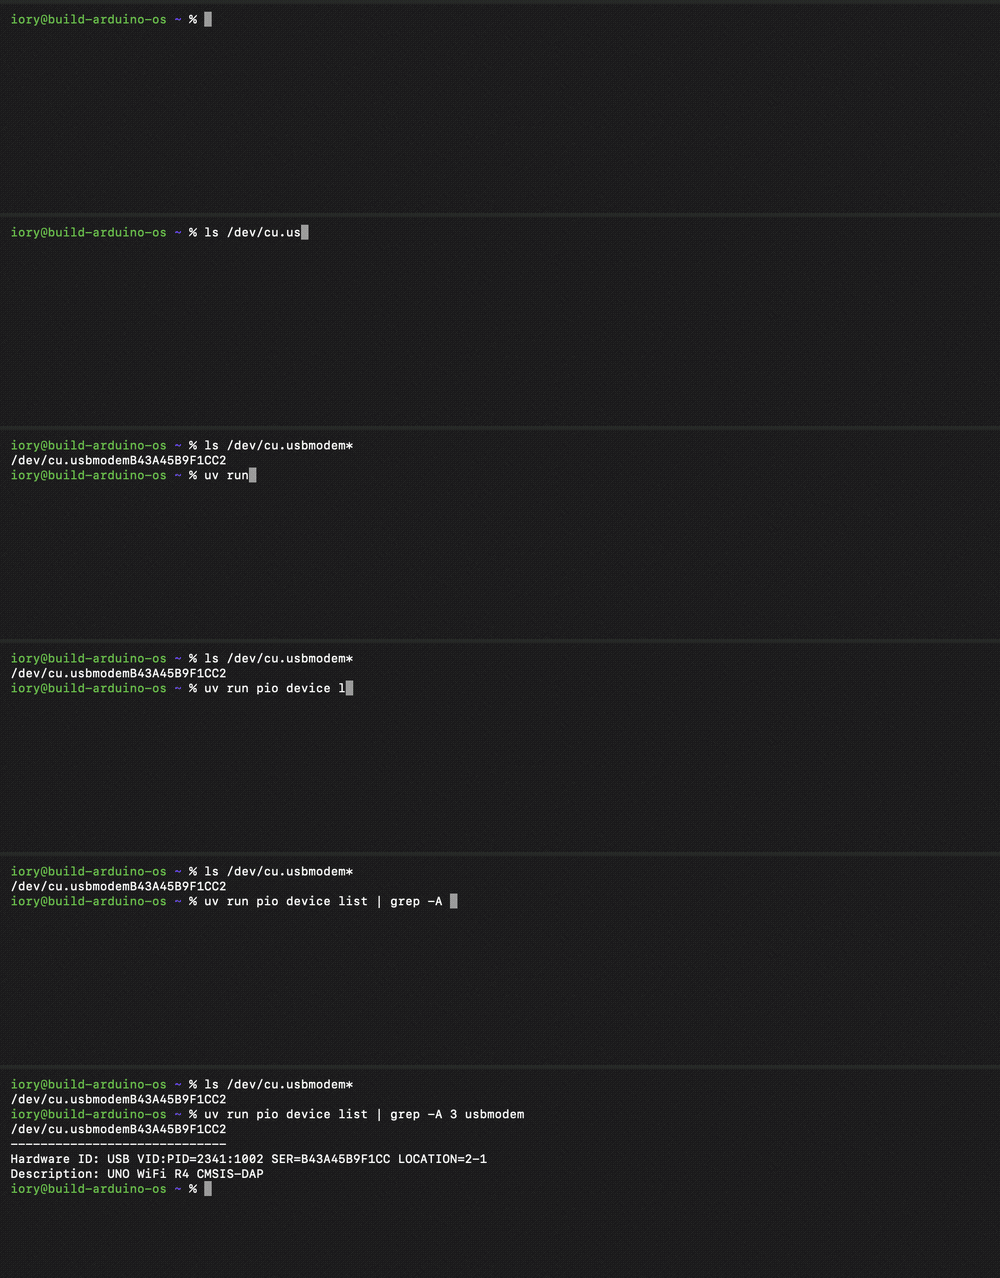
Looking for the board from a terminal. Type to the right of the % and press Enter#
Once a line like user@machine ~ % (the prompt) appears, you are ready. A
leading % in this guide just marks “type this here” — do not type the %.
Note
The prompt character depends on the shell: zsh (the macOS default) uses %,
bash uses $. What you type is the same either way.
Install uv#
uv manages the Python environment and packages. We run PlatformIO through it.
curl -LsSf https://astral.sh/uv/install.sh | sh
It installs into ~/.local/bin. The shell you installed from does not know
that path yet (the PATH is the list of folders the OS searches so a command runs by
its name alone), so typing uv right away gives command not found. Open a new
terminal, or run:
source ~/.zshrc           # ~/.bash_profile for bash
uv --version
source ~/.local/bin/env sets just the PATH.
Get the sample code#
git clone https://github.com/iory/learning-os-from-arduino.git
cd learning-os-from-arduino/docs/os-on-arduino/code
uv sync
If git is missing, macOS offers to install the Xcode command line tools the
first time you run it. Accept the dialog.
2. Find the board#
Just plug it in over USB. No driver install is needed.
uv run pio device list
macOS also lists Bluetooth devices as /dev/cu.*, so the board gets buried.
Filter with grep:
uv run pio device list | grep -A 3 usbmodem
/dev/cu.usbmodemXXXXXXXXXXXXX
-----------------------------
Hardware ID: USB VID:PID=2341:1002 SER=B43A45B9F1CC LOCATION=2-1
Description: UNO WiFi R4 CMSIS-DAP
grep picks out matching lines
| (a pipe) feeds the output of the left command into the right one.
grep usbmodem passes through only the lines containing usbmodem.
-A 3 also prints the 3 lines after each match (A for after). The port
name is followed by Hardware ID and Description, so without it you would
only see the port name.
A Hardware ID of 2341:1002 identifies the Arduino UNO R4 WiFi.
You get both cu. and tty.
macOS creates two device nodes for the same board:
/dev/cu.usbmodemXXXXXXXXXXXXX      ← use this one
/dev/tty.usbmodemXXXXXXXXXXXXX
cu (call-out) is for talking to a device; tty (call-in) is for waiting on
one. Use cu. for both flashing and the monitor. uv run pio device list
only reports the cu. names.
The trailing characters are the board’s serial number, so yours will differ.
Being a serial number, it does not change when you replug the board (unlike
ttyACM0 / ttyACM1 on Linux).
3. Build and flash#
uv run pio run -d 01_boot -t upload
Uploading .pio/build/uno_r4_wifi/firmware.bin
Erase flash

Done in 0.001 seconds
Write 35356 bytes to flash (9 pages)

[==============================] 100% (9/9 pages)
Done in 2.229 seconds
========================= [SUCCESS] Took 5.24 seconds =========================
The port is normally found automatically. Add --upload-port only when another
USB serial device confuses the detection.
uv run pio run -d 01_boot -t upload --upload-port /dev/cu.usbmodemXXXXXXXXXXXXX
4. Watch the serial monitor#
uv run pio device monitor -b 115200
Ctrl-C leaves the monitor.
Chapter 1 starts printing once you send a single S. Type S after the
monitor opens.
Why it waits for S
The board starts running the instant it is powered, while you need a few seconds
to open the monitor after flashing. A chapter that prints once from setup()
and stops would finish printing before your monitor is even open, and you
would see nothing. On top of that, the UNO R4 WiFi is not reset when you
open the serial port (the USB side is handled by the on-board ESP32-S3,
independently of the RA4M1 that runs your program), so reopening the monitor
will not replay it from the start either.
The S is how the PC says “I am ready”:
while (Serial.read() != 'S') { delay(1); }
01_boot, 01_boot_vector_dump, adv3_heap and adv4_fs work this way.
Chapters that keep printing (chapter 2, for example) do not need it.
=== Boot Sequence Check ===

bss_var (should be 0): 0
data_var (should be 12345): 12345

=== Memory Addresses ===
&bss_var:  0x200000C4
&data_var: 0x20000000
VTOR:      0x20007F00
MSP:       0x20007EC8

If you see this, boot sequence completed!
5. Where macOS trips you up#
You cannot flash while the monitor is open#
Only one program may hold the port. The serial monitor, the Arduino IDE and
your own Python script are mutually exclusive — close the monitor with Ctrl-C
before flashing.
The board is not found#
USB hubs sometimes fail. Plug straight into the Mac
A charge-only cable powers the board but carries no data. Use a data cable
Failing that, press RESET twice quickly to enter the bootloader (a small program resident on the MCU that accepts new firmware), then flash again
The /dev/cu. name is long#
It contains the serial number, but you rarely have to type it: pio finds
the port itself, and from Python you can look it up by vendor ID (below).
6. Talking to the board from Python#
Once flashing works, you will want to drive the board from the PC. uv sync
already installed pyserial.
The smallest example#
Flash Chapter 5 (05_shell) first. The shell is running,
so sending ps returns the task table.
import time
import serial
import serial.tools.list_ports

# Arduino's USB vendor ID, so no port name is hard-coded
port = next(p.device for p in serial.tools.list_ports.comports() if p.vid == 0x2341)
print("port:", port)

ser = serial.Serial(port, 115200, timeout=0.2)
time.sleep(1.0)                      # just after plug-in the port can drop bytes
ser.reset_input_buffer()

ser.write(b"ps\n")
time.sleep(0.8)
print(ser.read(4096).decode("utf-8", errors="replace").replace("\r\n", "\n"))
ser.close()
First save the code above as hello_serial.py in the docs/os-on-arduino/code
folder, then run it:
uv run python hello_serial.py
port: /dev/cu.usbmodemXXXXXXXXXXXXX
ps

ID  NAME           STATE      CPU%
--  ----           -----      ----
0   idle           READY     100%
1   LED1           BLOCKED   0%
2   LED2           BLOCKED   0%
3   Heartbeat      BLOCKED   0%
4   Shell          RUNNING   0%

>
Three things worth remembering#
Do not hard-code the port name. The p.vid == 0x2341 lookup above means
the same code runs on macOS, Windows and Linux. A literal
/dev/cu.usbmodem… will not work on anyone else’s Mac.
Wait a moment after opening. Bytes can be dropped right after plug-in.
Waiting a second and then calling reset_input_buffer() is reliable.
One program per port. Running a script while the monitor is open makes one of them fail.
7. Verifying every chapter#
A bundled script builds every chapter, flashes it, and checks that the serial output matches what the book says. It works unchanged on macOS.
uv run python scripts/verify_chapters.py
--only narrows it to specific chapters, and --build-only checks the builds
without a board attached. The script’s messages are in Japanese.