Developing on Linux#
Linux builds and flashes every chapter with the same commands as Windows and
macOS. The differences are the port name (/dev/ttyACM0) and how you install
the tools.
There are a few errors that only show up on Linux, and they are hard to diagnose if you have not seen them before, so this page lists them together with the real output. It also covers talking to the board from Python, which the book itself does not.
Note
The output on this page was captured from a real Arduino UNO R4 WiFi attached to Ubuntu 24.04 LTS (x86_64). Differences on other distributions are in section 9.
1. Set up#
Open a terminal#
Every command on this page is typed into a terminal. On Ubuntu, Ctrl + Alt + T opens one; looking up “Terminal” in the app list works too.
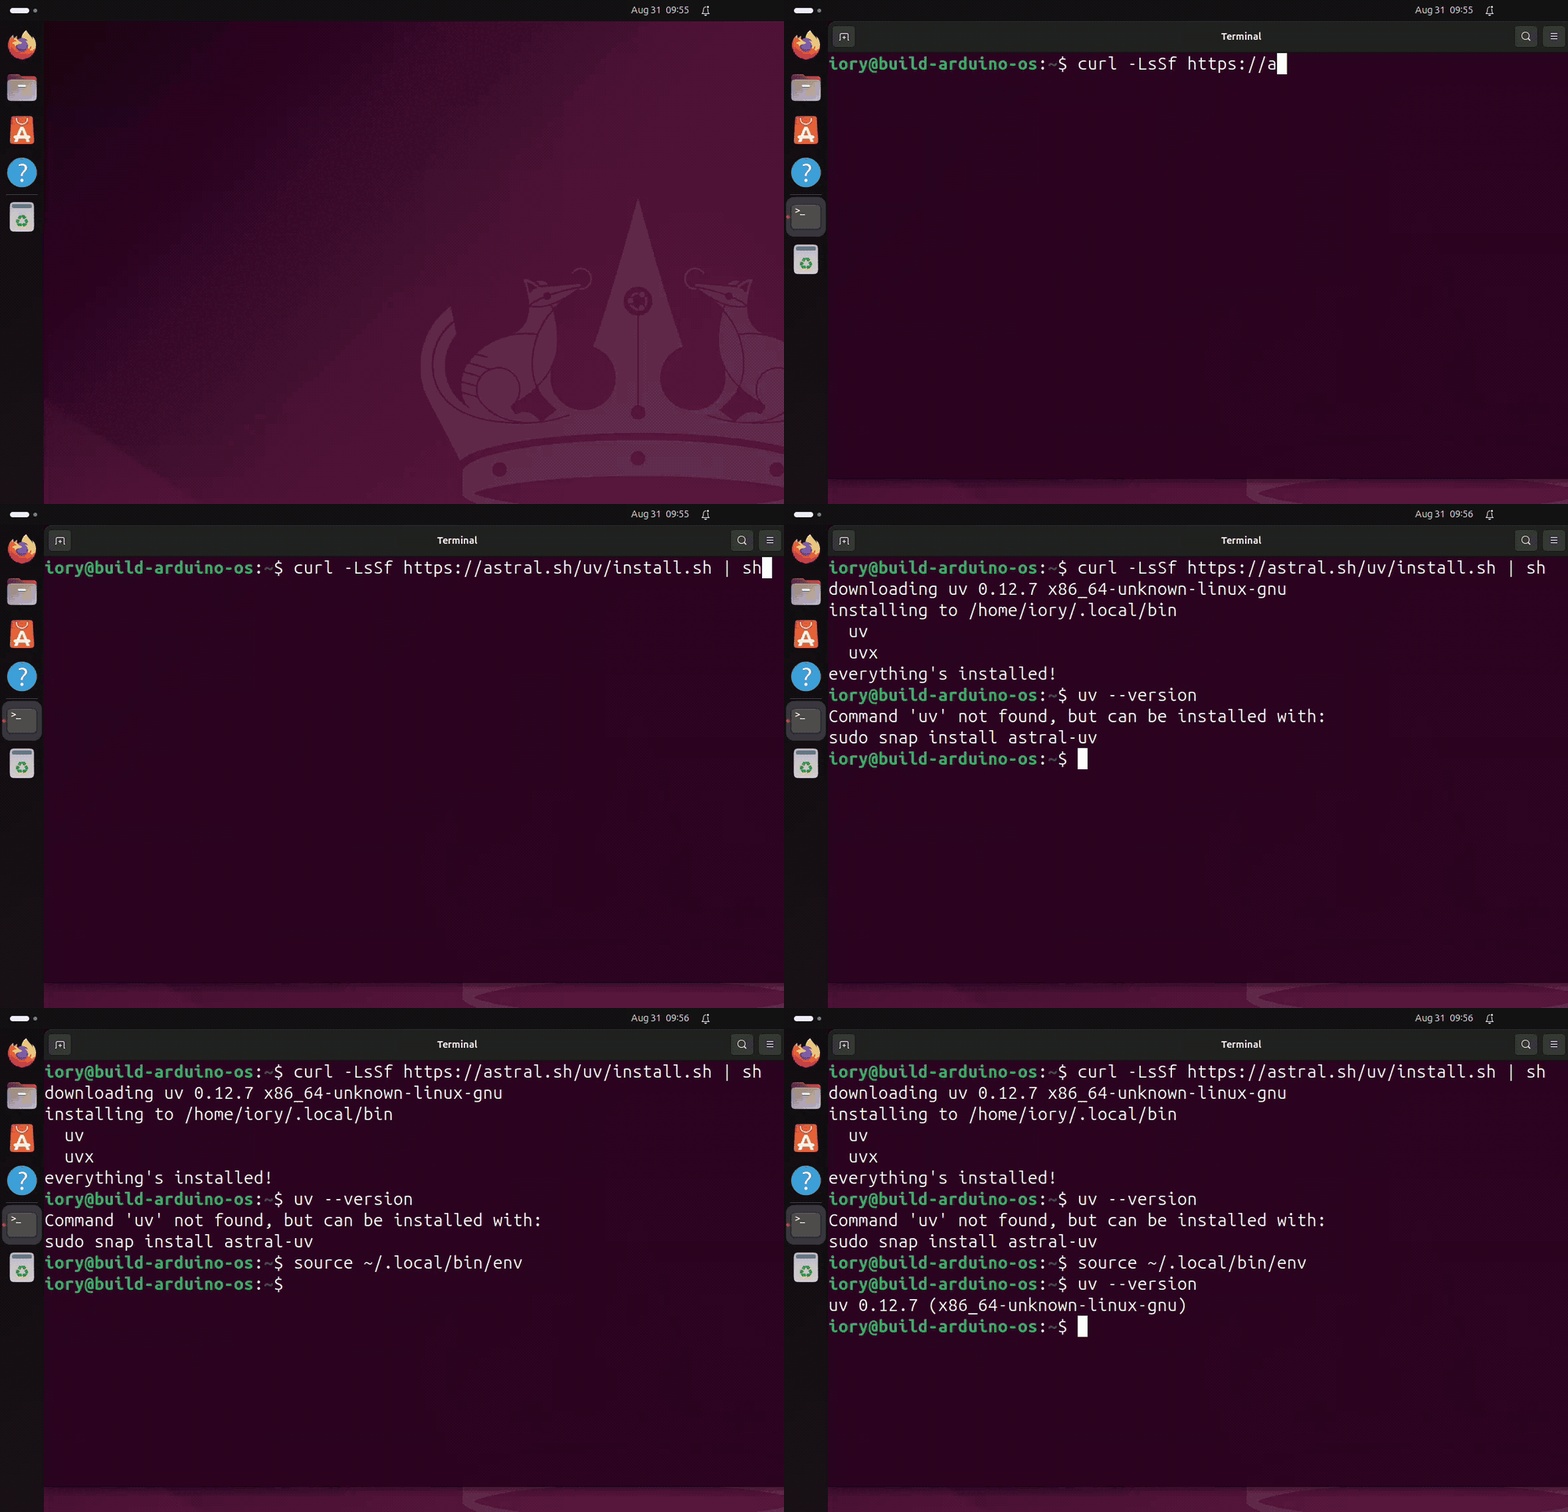
Opening a terminal and typing the uv install command that follows. The PATH
is not set yet, so uv --version only works after the source#
Once a line like user@machine:~$ (the prompt) appears, you are ready. Type a
command to the right of the $ and press Enter. A leading $ in this guide
just marks “type this here” — do not type the $ itself.
Install uv#
uv manages the Python environment and packages. We run PlatformIO through it.
curl -LsSf https://astral.sh/uv/install.sh | sh
It installs into ~/.local/bin. Open a new terminal, or reload your PATH (the list of
folders the OS searches so a command runs by its name alone):
source ~/.bashrc          # or ~/.zshrc for zsh
uv --version
source ~/.local/bin/env sets just the PATH (that is what the GIF above uses).
Ubuntu will suggest sudo snap install astral-uv at this point. Ignore it —
uv is already installed; only the PATH is missing.
Install git first if you do not have it:
sudo apt install -y git # Ubuntu / Debian
A command starting with sudo runs with administrator rights, so it asks for
your login password. Nothing is shown on screen while you type it; just type it
and press Enter.
Get the sample code#
git clone https://github.com/iory/learning-os-from-arduino.git
cd learning-os-from-arduino/docs/os-on-arduino/code
uv sync
uv sync installs PlatformIO and pyserial. You do not need to install a
compiler. PlatformIO downloads its own toolchain into ~/.platformio (a few
hundred MB on the first build, which takes a few minutes).
2. Before plugging in the board — install the udev rules#
Do this first. This adds a rule to udev (the Linux mechanism that decides things like permissions when a USB device is plugged in). It solves both problems described later (permissions and ModemManager) in one step.
curl -fsSL https://raw.githubusercontent.com/platformio/platformio-core/develop/platformio/assets/system/99-platformio-udev.rules \
  | sudo tee /etc/udev/rules.d/99-platformio-udev.rules >/dev/null
sudo udevadm control --reload-rules && sudo udevadm trigger
Unplug and replug the board afterwards. Rules are not applied retroactively to a device that is already connected.
These are PlatformIO’s official udev rules (official docs).
3. Find the board#
uv run pio device list
/dev/ttyACM0
------------
Hardware ID: USB VID:PID=2341:1002 SER=B43A45B9F1CC LOCATION=1-1:1.1
Description: UNO WiFi R4 CMSIS-DAP - TinyUSB CDC
2341:1002 is the Arduino UNO R4 WiFi. 2341 is Arduino’s USB vendor ID; we
use it later to find the port automatically from Python.
You may also see several /dev/ttyS* entries. Those are motherboard serial
ports and have nothing to do with the board. Look for ttyACM.
The number is not fixed
The 0 in /dev/ttyACM0 only means “the first one plugged in”. Unplug and
replug the board, or attach another USB serial device first, and the same board
becomes /dev/ttyACM1. If flashing suddenly fails with
No such file or directory, check this first.
uv run pio device list          # look for Hardware ID 2341:1002
ls /dev/ttyACM*                 # a quick glance
When you need to be certain which port is the board you just plugged in, the quickest way is to leave the kernel log running and plug it in:
sudo dmesg --follow # Ctrl-C to stop
Plug the board in and this line appears the moment it enumerates:
cdc_acm 1-1:1.1: ttyACM0: USB ACM device
The ttyACM0 part is the name of the board you just plugged in. Unplugging
prints USB disconnect, so replugging tells you the mapping for certain.
sudo is needed because dmesg is root-only on Ubuntu
(kernel.dmesg_restrict=1); without it you get
read kernel buffer failed: Operation not permitted.
The same happens on Windows (COM3 becomes COM5). Section 7 shows how to
write code that does not depend on the number.
4. Build and flash#
uv run pio run -d 01_boot -t upload
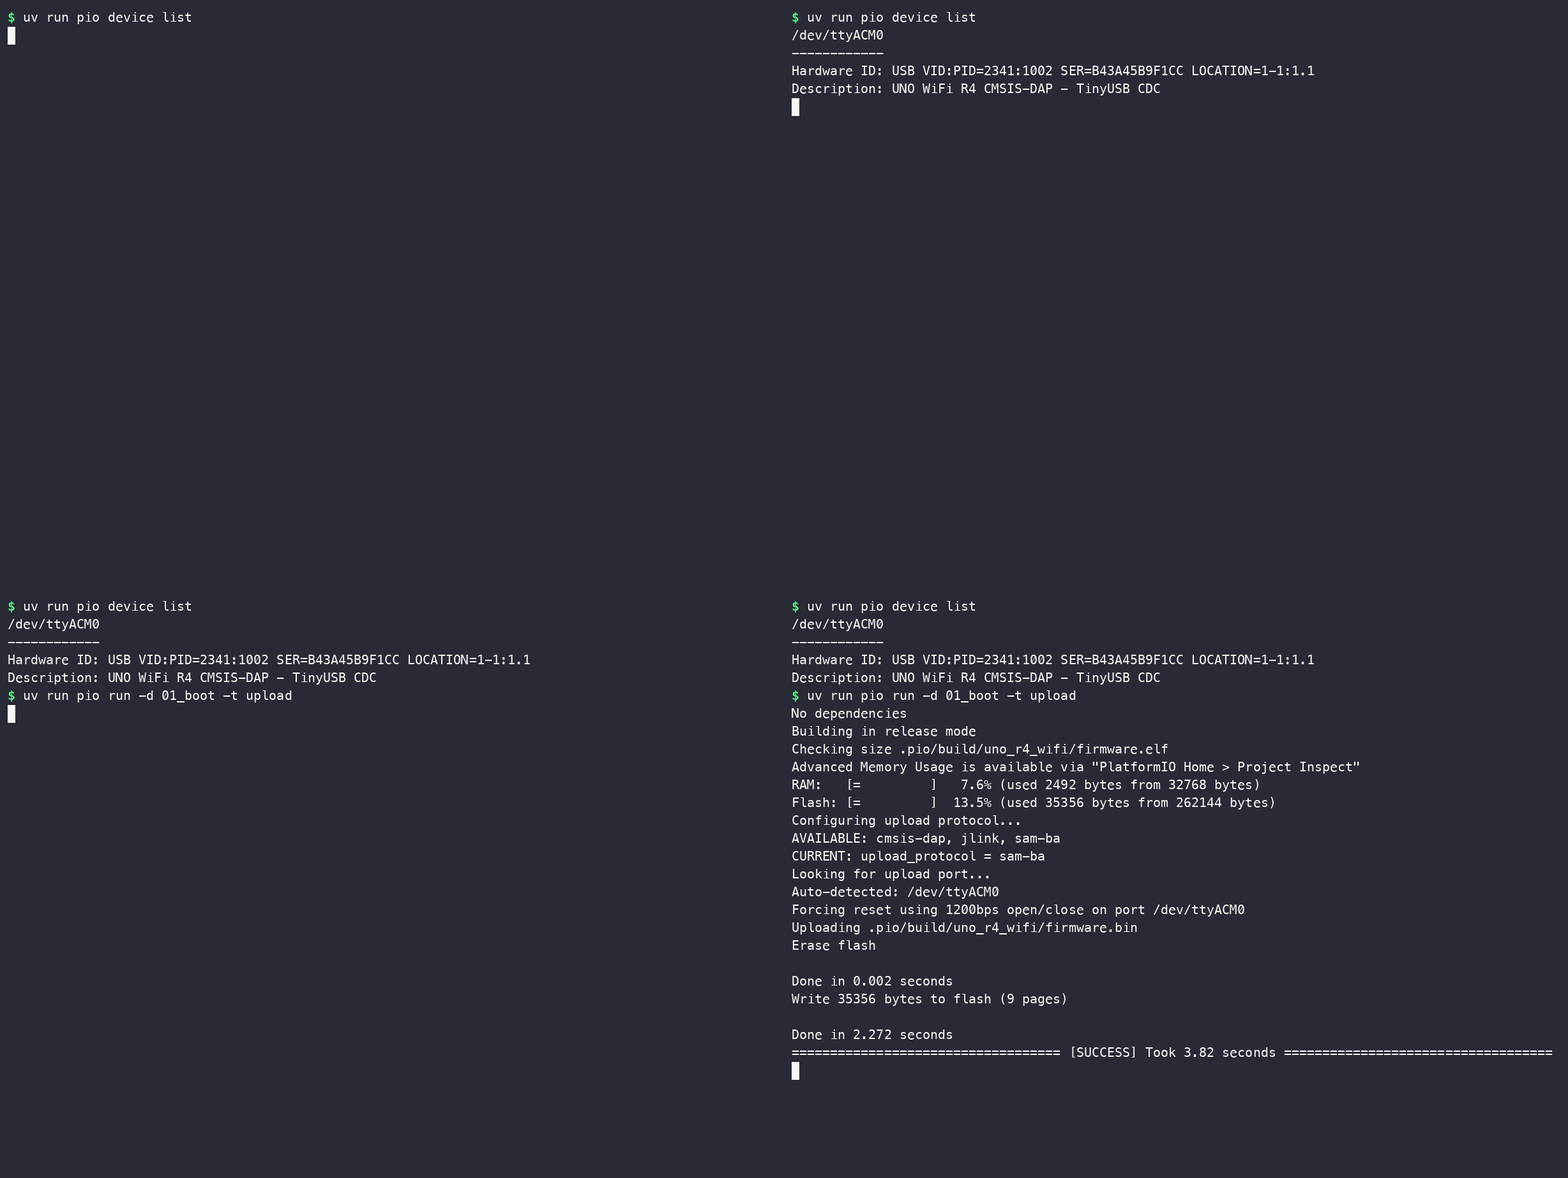
Checking the port and flashing, recorded on a real Ubuntu 24.04 machine#
As Auto-detected: /dev/ttyACM0 shows, you normally do not need to name the
port. Add --upload-port /dev/ttyACM0 only if another USB serial device
confuses the detection.
5. Watch the serial monitor#
uv run pio device monitor -b 115200
Chapter 1 starts printing once you send a single S. Type S after the
monitor opens.
Why it waits for S
The board starts running the instant it is powered, while you need a few
seconds to open the monitor after flashing. Chapter 1 prints once from
setup() and stops, so written naively it would finish printing before your
monitor is even open, and you would see nothing. On top of that, the UNO R4
WiFi is not reset when you open the serial port (the USB side is handled by
the on-board ESP32-S3, independently of the RA4M1 that runs your program), so
reopening the monitor will not replay it from the start either.
The S is how the PC says “I am ready”. The sketch spins on
while (Serial.read() != 'S') { delay(1); }
and starts printing once the S arrives, so it does not matter how late you
open the monitor.
On Linux there is a second reason: ModemManager opens the port right after
flashing, so while (!Serial) alone would wrongly conclude that a host is
attached (see section 6).
01_boot, 01_boot_vector_dump, adv3_heap and adv4_fs work this way.
Chapters that keep printing (chapter 2, for example) do not need it.
=== Boot Sequence Check ===

bss_var (should be 0): 0
data_var (should be 12345): 12345

=== Memory Addresses ===
&bss_var:  0x200000C4
&data_var: 0x20000000
VTOR:      0x20007F00
MSP:       0x20007EC8

If you see this, boot sequence completed!
Press Ctrl-C to leave the monitor.
6. Where Linux trips you up#
Permission denied: /dev/ttyACM0#
If you plug in the board without installing the udev rules:
$ cat /dev/ttyACM0
cat: /dev/ttyACM0: Permission denied
From Python:
PermissionError: [Errno 13] Permission denied: '/dev/ttyACM0'
The cause is the device file’s owning group:
$ ls -l /dev/ttyACM0
crw-rw---- 1 root dialout 166, 0 Aug 31 01:51 /dev/ttyACM0
#                  ^^^^^^^ you must be in this group to open it
Installing the udev rules (section 2) avoids this entirely. PlatformIO’s
rules set MODE="0666", so any user can open the port:
$ ls -l /dev/ttyACM0
crw-rw-rw- 1 root dialout 166, 0 Aug 31 02:12 /dev/ttyACM0
If you would rather not use the udev rules (for example if you only use the
Arduino IDE), add yourself to the dialout group instead:
sudo usermod -aG dialout $USER
You must log out and back in afterwards — group changes do not apply to an
existing session. newgrp dialout enables it in the current terminal only.
ModemManager grabs the board#
Ubuntu runs ModemManager, a daemon that inspects any USB serial device that
appears, in case it is a cellular modem. An Arduino is not a modem, but the port
gets opened right after you plug it in, so a sketch that prints only from
setup() can finish printing before your monitor is even open.
That is why Chapter 1 waits for an S.
Check what your machine does:
$ udevadm info -q property -n /dev/ttyACM0 | grep ID_MM
ID_MM_CANDIDATE=1
If you only see ID_MM_CANDIDATE=1, ModemManager is going to probe it.
After installing the udev rules (section 2):
$ udevadm info -q property -n /dev/ttyACM0 | grep ID_MM
ID_MM_CANDIDATE=1
ID_MM_DEVICE_IGNORE=1
ID_MM_PORT_IGNORE=1
With ID_MM_DEVICE_IGNORE=1 set, ModemManager leaves the device alone.
Why PlatformIO’s rules work here
The Arduino line in the official rules restricts idProduct to [08][023]*,
and the UNO R4 WiFi’s PID 1002 does not match it. What actually matches is
a different line further down:
ATTRS{product}=="*CMSIS-DAP*", MODE="0666", ENV{ID_MM_DEVICE_IGNORE}="1", ENV{ID_MM_PORT_IGNORE}="1"
The UNO R4 WiFi reports its USB product name as UNO WiFi R4 CMSIS-DAP, so it
matches on the product name, not the PID.
On a machine that never uses mobile broadband you can simply turn the service off, though the udev rules make that unnecessary:
sudo systemctl disable --now ModemManager
You cannot flash while the monitor is open#
Only one process can hold the serial port. Flashing with the monitor still open
fails with Device or resource busy (the Linux equivalent of Windows’
PermissionError). Close the monitor with Ctrl-C and flash again.
The same applies to the Arduino IDE’s serial monitor and to your own Python scripts.
Other things#
brlttyis a braille-display daemon that ships with Ubuntu. It hijacks some USB serial devices, so if/dev/ttyACM0appears and immediately disappears, suspect it (systemctl status brltty). It has not been observed with the UNO R4 WiFi, but it can happen with USB-serial adaptersFlashing through a USB hub sometimes fails. Try a direct port on the machine
If the board stops responding, press RESET twice quickly to enter the bootloader (a small program resident on the MCU that accepts new firmware)
7. Talking to the board from Python#
The book only goes as far as the serial monitor, but as soon as you build
something real you will want your PC to talk to the board. Use pyserial,
which uv sync already installed.
A minimal example#
Flash Chapter 5 (05_shell) first. The shell is
running, so sending ps returns the task table.
import time
import serial
import serial.tools.list_ports

# Arduino's USB vendor ID — so you never have to hard-code the port name
port = next(p.device for p in serial.tools.list_ports.comports() if p.vid == 0x2341)
print("port:", port)

ser = serial.Serial(port, 115200, timeout=0.2)
time.sleep(1.6)          # just after plug-in the port can drop bytes
ser.reset_input_buffer()

ser.write(b"ps\n")
time.sleep(1.0)
print(ser.read(4096).decode("utf-8", errors="replace"))
ser.close()
First save the code above as hello_serial.py in the docs/os-on-arduino/code
folder, then run it:
uv run python hello_serial.py
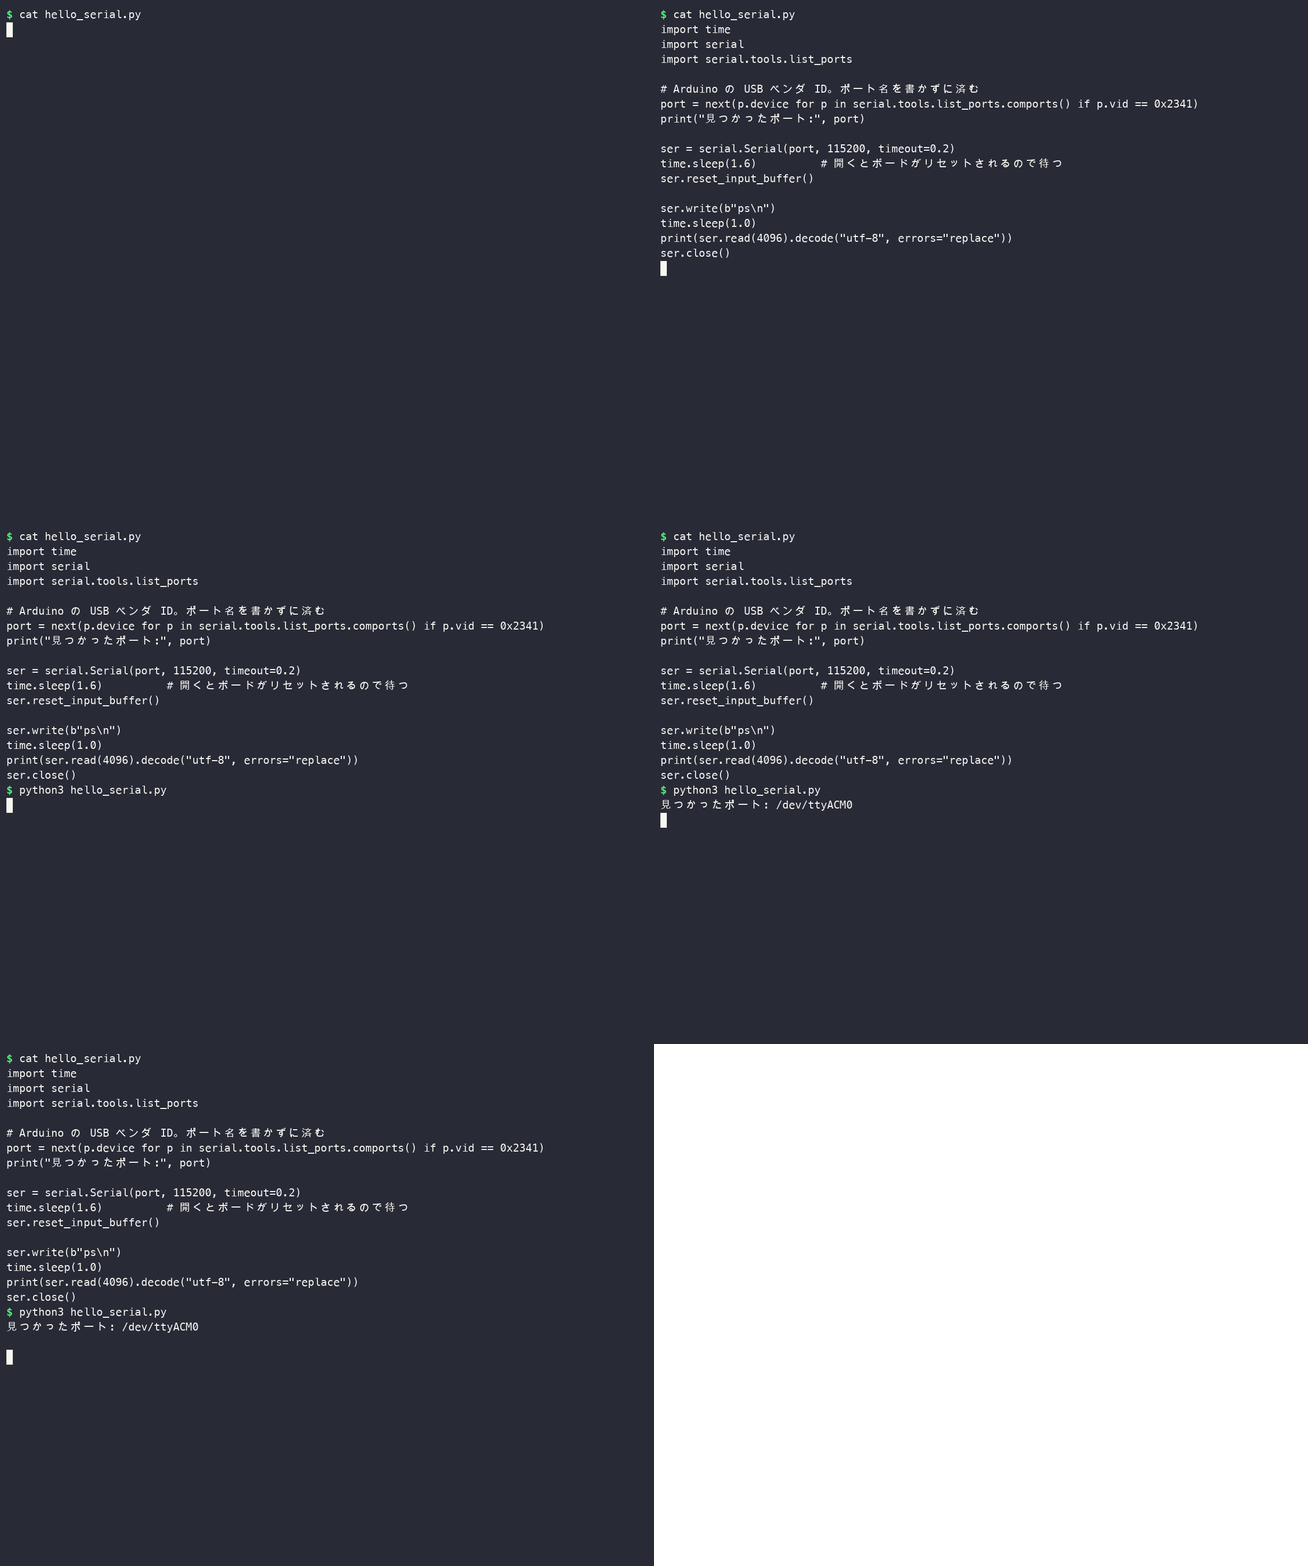
Running hello_serial.py#
port: /dev/ttyACM0
ps

ID  NAME           STATE      CPU%
--  ----           -----      ----
0   idle           READY     100%
1   LED1           BLOCKED   0%
2   LED2           BLOCKED   0%
3   Heartbeat      BLOCKED   0%
4   Shell          RUNNING   0%

>
Typing commands interactively#
If you would rather type commands than hard-code them, a short console is all it takes — just move the reading side onto its own thread.
"""A minimal serial console for the board's shell. Ctrl-D to quit."""
import sys
import time
import threading
import serial
import serial.tools.list_ports

port = next(p.device for p in serial.tools.list_ports.comports() if p.vid == 0x2341)
print(f"connected: {port}")

ser = serial.Serial(port, 115200, timeout=0.2)
time.sleep(1.6)                      # just after plug-in the port can drop bytes
ser.reset_input_buffer()

def reader():                        # stream whatever the board sends
    while True:
        data = ser.read(4096)
        if data:
            sys.stdout.write(data.decode("utf-8", errors="replace"))
            sys.stdout.flush()

threading.Thread(target=reader, daemon=True).start()

# `for line in sys.stdin` buffers ahead; use readline for interactive input
for line in iter(sys.stdin.readline, ""):
    ser.write(line.encode())
    ser.flush()
Save the code above as serial_console.py in the docs/os-on-arduino/code folder,
then run it:
uv run python serial_console.py
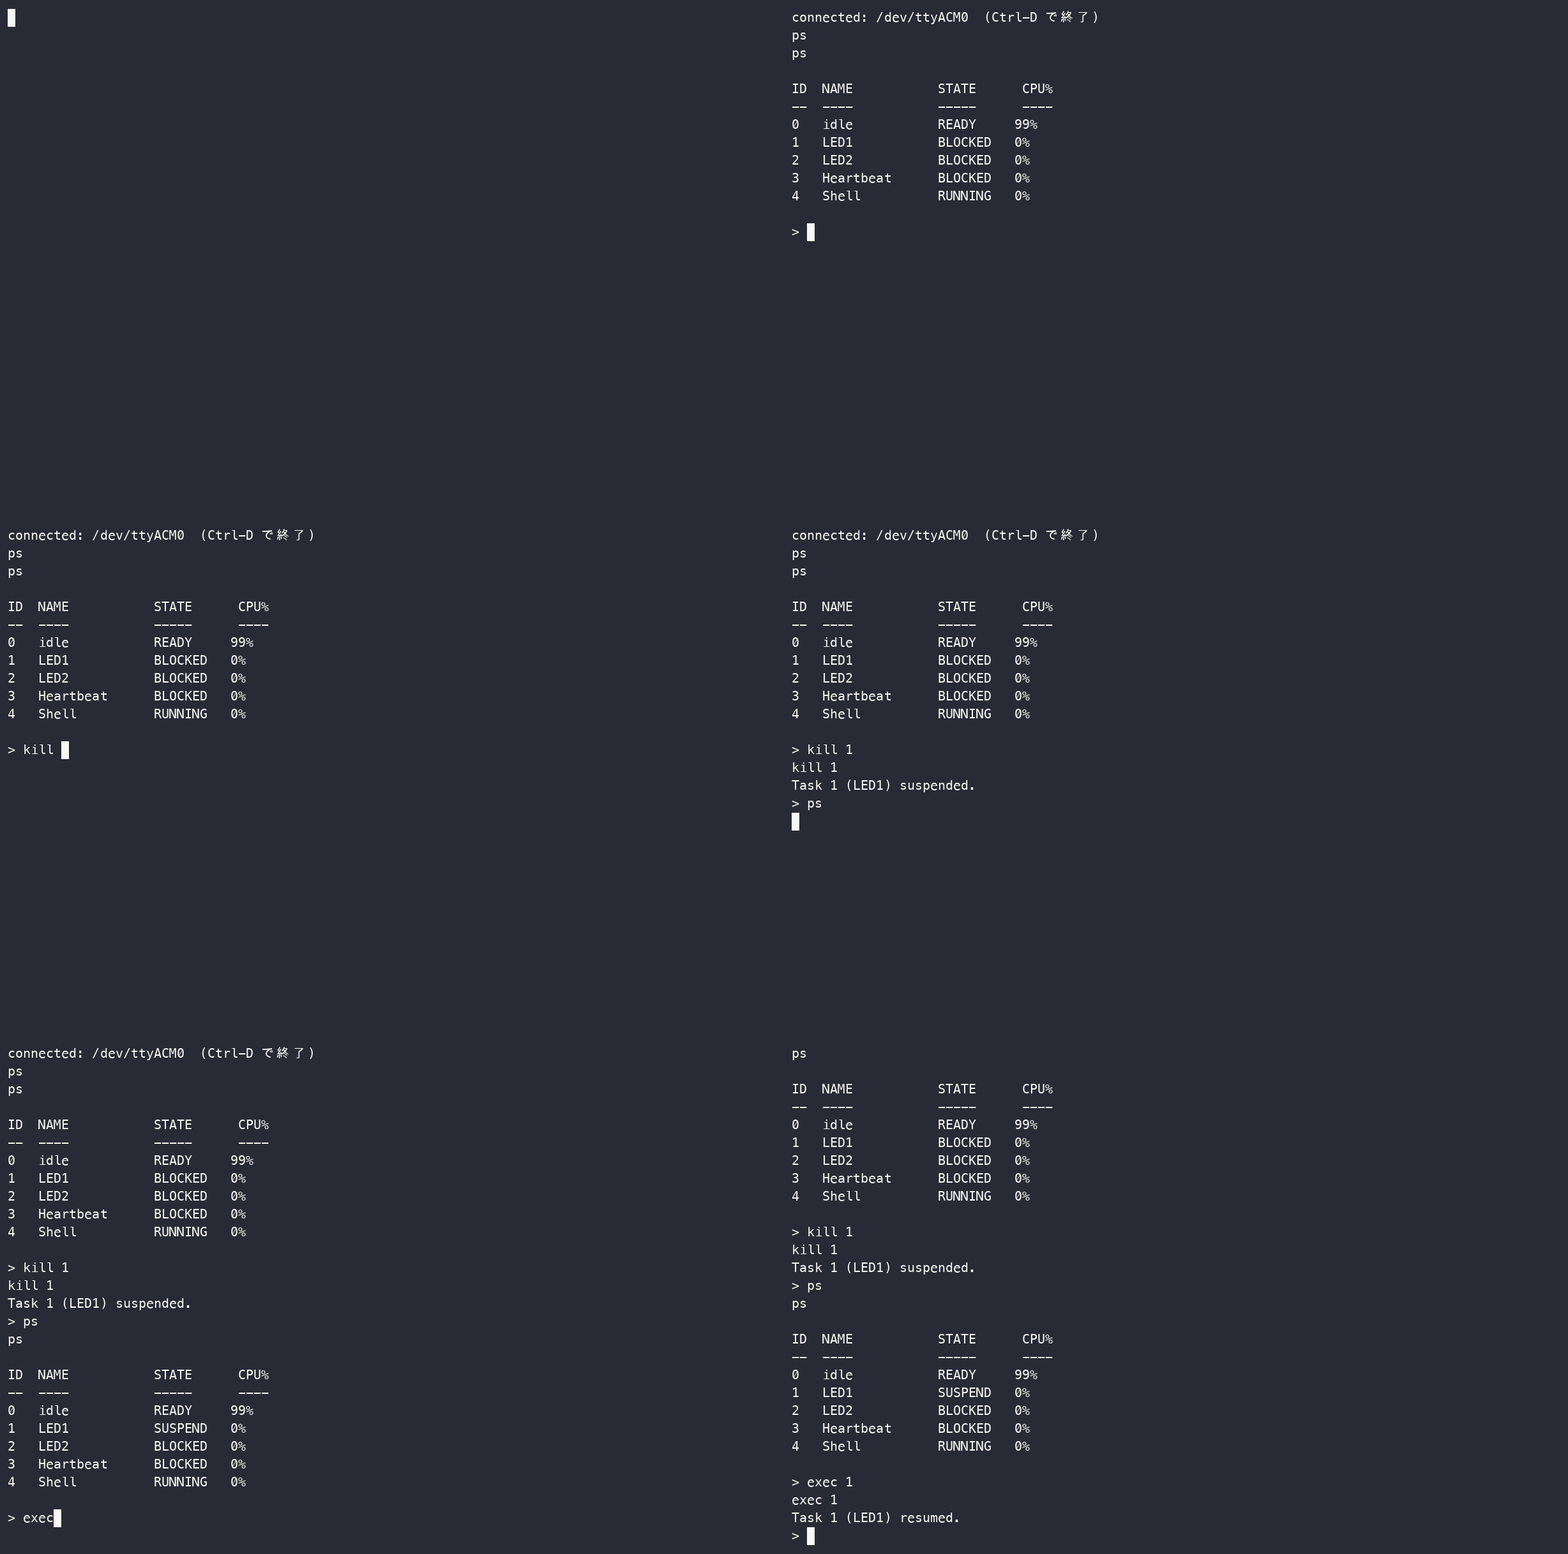
ps to list the tasks, kill 1 to stop LED1 (it turns SUSPEND), and
exec 1 to bring it back — typed on a real Ubuntu 24.04 machine#
kill 1 stops the L LED blinking on the board and exec 1 restarts it. Check
that the STATE column and the LED in front of you agree.
Three things worth remembering#
Do not hard-code the port name. Looking it up with p.vid == 0x2341 means
the same code runs on Linux, macOS and Windows — only the returned string
differs (/dev/ttyACM0 / /dev/cu.usbmodem... / COM3).
Wait a moment after opening. The UNO R4 WiFi does not reset when the port is
opened, but right after plugging in, the first output or a command can be lost.
That is what the time.sleep in the code above is for.
Only one process can hold the port. Close the PlatformIO monitor or the Arduino IDE before running your script.
8. Driving the quadruped from your PC#
You can skip this until Chapter 13.
Bringing up and calibrating the Chapter 13 robot is much faster from the PC — every value is on screen and you do not reflash after each change.
cd 13_quadruped/host                   # from docs/os-on-arduino/code
uv run python quad_host.py scan        # how many servos are on the bus
uv run python quad_host.py calibrate   # measure zero and sign -> calib.json
uv run python quad_host.py stand       # hold the home pose
uv run python quad_host.py teleop      # walk with w/s/a/d
Add --port /dev/ttyACM0 if you need to name the port.
9. Other distributions#
This page was verified on Ubuntu 24.04. The steps are essentially the same elsewhere; only package installation and the group name differ.
Ubuntu / Debian |
Fedora |
Arch |
|
|---|---|---|---|
Install git |
|
|
|
Serial group |
|
|
|
Installing uv and PlatformIO’s toolchain is identical on every
distribution. You never need to provide your own compiler.
To find the group your system uses:
$ ls -l /dev/ttyACM0
crw-rw---- 1 root dialout 166, 0 Aug 31 01:51 /dev/ttyACM0
#                  ^^^^^^^ this is the group you need to join
With the udev rules installed, the group stops mattering at all.
10. Verifying every chapter at once#
A bundled script builds every chapter, flashes it, and checks that the serial output matches what the book says.
uv run python scripts/verify_chapters.py
--only narrows it to specific chapters, and --build-only checks the builds
without a board attached. The script’s messages are in Japanese.
全章の動作確認 — full options and interactive mode, on the Japanese site ↗